Materials
Cut 11” x 3” pieces of the following:
1 x quilt batting
1 x front fabric
1 x lining fabric
You will also need:
short piece of ribbon button for closurebutton
12mm bias binding
To make the case
Quilt the three fabric layers together. I used a free motion quilting foot (badly).
 |
| Sandwich the batting between two layers of printed fabric with the right sides facing outwards. |
Trim the sandwich into a true rectangle again.
Bind the shortest edge of the sandwich and then add the button to the front, about 1.5” from the bound edge.
 |
| Binding one of the short edges |
Fold the bound edge upward to create the pocket and stitch along the sides (very close to the edge) to hold it in place.
 |
| Creating the pocket and adding a ribbon loop |
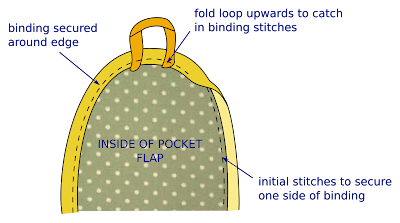
Bind the edge of the case, curving the binding around the top flap. Start by stitching the opened binding to the outside of the case all the way around, and then fold the binding back up and over the raw edge toward the inside. Next, top-stitch over the binding to hold it in place; as you stitch over the curved top, fold the ribbon loop outward so that it catches in the stitching.
 |
| Binding top curved edge, catching the ribbon loop |
This tutorial is part of a series:

No comments:
Post a Comment