
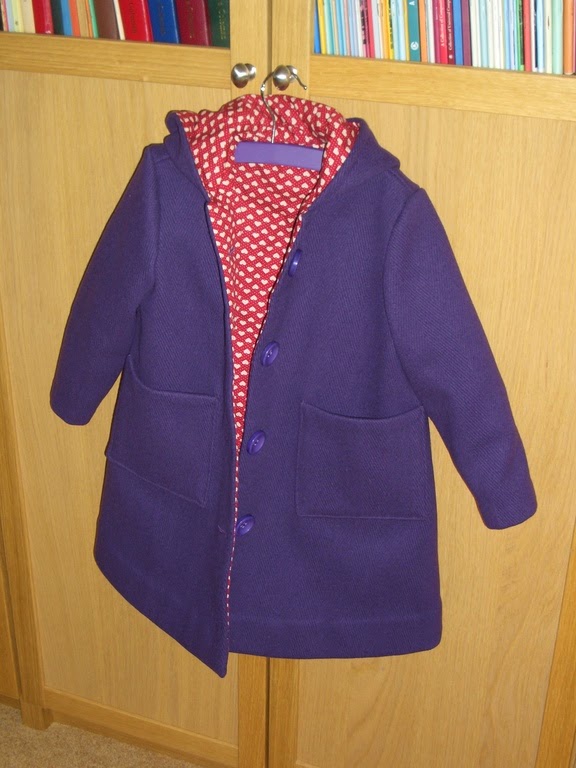
I needed a birthday gift for one of their little friends, and I don't often get to sew girlie things. I'd just sorted through my stash with the helpful and ever tolerant husband, and I remembered I had a little deliciously soft purple coat fabric left over from this 1969 coat (which incidentally I am still wearing 5 years later). I think the purple coat fabric might be wool (or at least with wool content) as it smells like a wet sheep when you press it with the steam iron. I also had some fun deep red cotton with hearts on it. The perfect chance to try the duffle pattern!
The book suggests to enlarge the pattern using graph paper (a small pattern graph is provided). Since it's no longer the 1970s, I used the magic of a scanner to copy the page, threshold the image into black and white in Gimp, enlarge it in Inkscape and print it out again directly at the correct scale. Toddler helped me tape all the pages together.
 |
| Check out my scanned book-page pattern! |
I managed to cut out the coat... just! I had to re-draft the hood into a three-piece version, because I didn't have scraps big enough to cut the original two-piece one. This page was helpful to confirm that a shaped gusset wasn't necessary- I just went with a 3.5" wide strip.

After cutting out, I had some small 3" fabric scraps left, but that was about it. I didn't have enough red cotton to cut sleeves out, but I found some purple lining in my stash that was lopped off the bottom of the skirt of my purple practice wedding dress when I made it into a cocktail dress. It couldn't be a more perfect match, and it will be better to have silky sleeve linings anyway (so you can slide your arms in and out). I also found some of my original purple thread spool - bonus!
 |
| Check out those silky sleeves! |
The pattern calls for toggles, but I doubted my ability to find matching purple cord for them. I was just about to gamble on an online button purchase for something that didn't match when I remembered I'd bought a job-lot of purple miss-matched buttons for £1 a while back. When I looked, there were 5 matching buttons of the perfect size! Can you believe it? They're pretty much the only matching set in the bag, and they were perfect! Seriously, dudes, this coat was meant to be: all I've had to buy was one extra spool of purple thread.
I have some beef with the pattern. Clearly my method allows a perfect reproduction of the pattern proportions given, so it's not my pattern copying. Yet the two sleeve edges are totally different lengths and can never match! Dumb! Also the pattern match notches provided on the underneath of the sleeves and armholes don't match, which makes you wonder why they bothered providing them. Neither do the pocket markings. Notches on the hood/neckline would have been handy, but when the others are useless I can see why they didn't bother.
The suggested method to make the patch pockets is just to sew lining and outer fabric right-sides together, turn inside out, press and apply. I decided to change the method of patch-pocket construction so that the lining is not visible along the outer edges when the patch is applied. I mitred the corners of my outer fabric, and trimmed 1/4" from around my lining. Then I stitched the lining to the pocket piece with at 1/4" allowance. It's a little fiddly, but the result is that reverse of the patch has the lining inserted 1/4" from the edge all round. That meant that even if the edges rolled a little as I applied the patch, the lining wouldn't peak through. I think if I were to make the pattern again, I'd also add a front facing to the coat, so that the lining doesn't peak around the front edges. I'd also add some sort of stabilising inside the front edge to support the buttons and button-holes.
No word on how deep the sleeve hem is supposed to be, so I picked 7/8" because making it the same as the 2" lower hemline looked a bit short in the sleeve. I decided to catch-stitch the main coat hem in all the way around so that it would be more hard-wearing: the little ties between coat hem and lining they suggested to make at the seams would surely not last a toddler 2 minutes! I also added a hanging loop.
Finally, I like it when people post pictures of their sewing space. It's always a beautifully well-lit white room with colourful spools on the wall, a neat inspiration board and a tidy white desk. Alternatively they produce wonderful candid finished shots of their adorable toddler progeny in a meadow with their new hand-sewn clothes. I'd like to provide an antidote to this and show you the gritty reality of sewing with a toddler and baby.
I do my sewing on the dining room table, which is in a sadly windowless room in the centre of the house. I cut out on the floor in the most well-lit part of the house: in front of the French windows in the lounge. Behold:

As you can see, I am keeping the sharp pins, scissors and sleeping baby away from the wrecking toddler by means of a playpen unfurled into a room-divider. There are also exercise balls, empty coffee cups and bags of fabric scraps. Photo taken with my back to a sea of plastic toy vegetables and bolts mixed up with jigsaw pieces all over the rest of the lounge carpet. Since I took this photo, toddler learned to open the gate by himself, so pins and scissors and baby all had to be moved.
Coming soon: adorable toddler frolicking in meadow, for which read: blurred image of muddy boy in a field, wearing wellies and a bobbly garish knitted hat sadly covered in sawdust and wood-shavings from the garage.
No comments:
Post a Comment